More actions
m Update layout to upstream |
Added a guide for the TEG |
||
| (12 intermediate revisions by 4 users not shown) | |||
| Line 1: | Line 1: | ||
== Power | {{Needs revision | ||
|reason=Severly Outdated. Needs sections on the TEG (very important!), Tesla | |||
|image=RebaseWork.png | |||
}} | |||
= Power = | |||
Engineering generates power, which is essential for keeping a well-functioning space station from descending into darkness. Most computers, machines, lighting fixtures, and more require power to operate. | Engineering generates power, which is essential for keeping a well-functioning space station from descending into darkness. Most computers, machines, lighting fixtures, and more require power to operate. | ||
= Supply and Demand = | |||
Running an efficient power operation is about delicately balancing the supply of power from generators with demand from station equipment. Thanks to cutting-edge energy storage technology (SMES, and batteries in substations and APCs) aboard NanoTransen stations, generators do not have to always match instantaneous station demand; it is enough to generate enough power to meet the average station demand. | Running an efficient power operation is about delicately balancing the supply of power from generators with demand from station equipment. Thanks to cutting-edge energy storage technology (SMES, and batteries in substations and APCs) aboard NanoTransen stations, generators do not have to always match instantaneous station demand; it is enough to generate enough power to meet the average station demand. | ||
| Line 13: | Line 17: | ||
If long term demand exceeds supply, you will have angry station inhabitants complaining about lack of power. When supply exceeds demand, the extra power is used to charge energy storage devices. When all energy storage devices are full, the excess power is safely dissipated into space. | If long term demand exceeds supply, you will have angry station inhabitants complaining about lack of power. When supply exceeds demand, the extra power is used to charge energy storage devices. When all energy storage devices are full, the excess power is safely dissipated into space. | ||
It is better to be in a long-term energy surplus than an energy deficit. On the other hand, if your station is powered by non-renewable sources like the Anti-Matter Engine (AME), generating much more power than you need wastes fuel and contributes to space warming, not to mention, wastes | It is better to be in a long-term energy surplus than an energy deficit. On the other hand, if your station is powered by non-renewable sources like the Anti-Matter Engine (AME), generating much more power than you need wastes fuel and contributes to space warming, not to mention, wastes Logistics's money ''which they would have wasted on a lasers crate anyway''. | ||
= The Power Hierarchy = | |||
Power transmission in SS14 comes in three different flavors, high voltage (HV) cables (orange), medium voltage (MV) cables (yellow) and low voltage (LV) cables (green). | Power transmission in SS14 comes in three different flavors, high voltage (HV) cables (orange), medium voltage (MV) cables (yellow) and low voltage (LV) cables (green). | ||
| Line 25: | Line 29: | ||
Power flows from generators and power storage via HV cables to substations around the station. From substations, MV cables going out transmit power from the substation and connected grid to area power controllers (APCs) where LV cables take the power the rest of the way to consumers (3-4 tile radius from the APC to devices in the area). '''A cable must be placed under generators, storage, substations and APCs for them to function'''. | Power flows from generators and power storage via HV cables to substations around the station. From substations, MV cables going out transmit power from the substation and connected grid to area power controllers (APCs) where LV cables take the power the rest of the way to consumers (3-4 tile radius from the APC to devices in the area). '''A cable must be placed under generators, storage, substations and APCs for them to function'''. | ||
== Separating your Grid == | |||
One device not mentioned so far is the cable terminal. In order to separate part of your power network you will need to use a cable terminal, with a HV cable on the terminal box side and the wire side facing towards a SMES. When a HV cable is then placed under the SMES this creates two distinct HV cable networks; the side with your generation on which ends at the cable terminal, and the storage / supply side which starts at the SMES and goes out to substations. | One device not mentioned so far is the cable terminal. In order to separate part of your power network you will need to use a cable terminal, with a HV cable on the terminal box side and the wire side facing towards a SMES. When a HV cable is then placed under the SMES this creates two distinct HV cable networks; the side with your generation on which ends at the cable terminal, and the storage / supply side which starts at the SMES and goes out to substations. | ||
Currently if you place a substation on the generation side of your SMES it will drain into said SMES as a supplier. This is important as in this scenario if there isn't enough generation, the substation will drain to empty causing a blackout in its connected APCs while everything on the SMES side will remain powered. | Currently if you place a substation on the generation side of your SMES it will drain into said SMES as a supplier. This is important as in this scenario if there isn't enough generation, the substation will drain to empty causing a blackout in its connected APCs while everything on the SMES side will remain powered. | ||
= Generation = | |||
All power on the station comes from either a generator or an energy storage device. In this section we will discuss generators, and in brief, engines. All engines are generators but not all generators are engines. | All power on the station comes from either a generator or an energy storage device. In this section we will discuss generators, and in brief, engines. All engines are generators but not all generators are engines. | ||
== The Antimatter Engine == | |||
The Antimatter Engine (AME) is the main source of power for most stations. Engineering is responsible for setting up the AME at round start. | The Antimatter Engine (AME) is the main source of power for most stations. Engineering is responsible for setting up the AME at round start. | ||
=== Setup === | |||
# Grab AME parts from a '''Packaged antimatter reactor''' crate and place one on each floor tile you want a piece of the reactor. The minimum is a 3×3 square, which gives one core. [[File:AME_setup_example1.png|thumb|none|3×3, 1-core AME]] | # Grab AME parts from a '''Packaged antimatter reactor''' crate and place one on each floor tile you want a piece of the reactor. The minimum is a 3×3 square, which gives one core. [[File:AME_setup_example1.png|thumb|none|3×3, 1-core AME]] | ||
# With a multitool in hand, click the AME parts on the floor to build a piece of the reactor. If you mess up, you can deconstruct a built reactor with a lit welder. | # With a multitool in hand, click the AME parts on the floor to build a piece of the reactor. If you mess up, you can deconstruct a built reactor with a lit welder. | ||
| Line 42: | Line 46: | ||
# Open the ''antimatter containment jar crate'' to obtain ''antimatter containment jars''. This is the fuel for the AME. With it in hand, click on the controller to place it in the AME. Change the ''Injection Amount'' to the desired level (see table below) and click ''Toggle Injection'' to turn the AME on. [[File:AME_completed_example1.png|thumb|none|Finished AME]] | # Open the ''antimatter containment jar crate'' to obtain ''antimatter containment jars''. This is the fuel for the AME. With it in hand, click on the controller to place it in the AME. Change the ''Injection Amount'' to the desired level (see table below) and click ''Toggle Injection'' to turn the AME on. [[File:AME_completed_example1.png|thumb|none|Finished AME]] | ||
{| class="wikitable" | |||
|+ AME | {{Important | ||
|Title=Warning | |||
|Note=Do not set injection greater than (2× the number of cores). Doing so will cause reactor instability, which will sooner or later destroy the reactor. | |||
|Image=engineer.png | |||
|Color=#eb9b34 | |||
}} | |||
The wattage produced by the AME in different configurations is shown below. The color indicates the state - green: safe, yellow: Overloaded (explodes eventually), Orange: Heavily Overloaded (explodes soon), Red: Extremely Overloaded (explodes within the minute) | |||
<div style="display: flex; justify-content: center"> | |||
{| class="wikitable" style="color:#000000;" | |||
|+ style="color:#ffffff;" | AME power production in kW | |||
|- | |||
! | |||
! style=" font-size:100%;" | | |||
! colspan="10" style="text-align:center; " | Cores | |||
|- style="text-align:center;" | |||
! style="text-align:left;" | | |||
! style=" font-size:100%; text-align:left;" | | |||
! style="" | 1 | |||
! style="" | 2 | |||
! style="" | 3 | |||
! style="" | 4 | |||
! style="" | 5 | |||
! style="" | 6 | |||
! style="" | 7 | |||
! style="" | 8 | |||
! style="" | 9 | |||
! style="" | 10 | |||
|- | |||
! rowspan="11" | Injection | |||
! style="text-align:center; font-size:100%;" | 2 | |||
| style=" background-color:#92D050;" | 80.0 | |||
| style=" background-color:#92D050;" | 40.0 | |||
| style=" background-color:#92D050;" | 26.7 | |||
| style=" background-color:#92D050;" | 20.0 | |||
| style=" background-color:#92D050;" | 16.0 | |||
| style=" background-color:#92D050;" | 13.3 | |||
| style=" background-color:#92D050;" | 11.4 | |||
| style=" background-color:#92D050;" | 10.0 | |||
| style=" background-color:#92D050;" | 8.9 | |||
| style=" background-color:#92D050;" | 8.0 | |||
|- | |- | ||
! | ! style="text-align:center; font-size:100%;" | 4 | ||
| style=" background-color:#FF0;" | 320.0 | |||
| style=" background-color:#92D050;" | 160.0 | |||
| style=" background-color:#92D050;" | 106.7 | |||
| style=" background-color:#92D050;" | 80.0 | |||
| style=" background-color:#92D050;" | 64.0 | |||
| style=" background-color:#92D050;" | 53.3 | |||
| style=" background-color:#92D050;" | 45.7 | |||
| style=" background-color:#92D050;" | 40.0 | |||
| style=" background-color:#92D050;" | 35.6 | |||
| style=" background-color:#92D050;" | 32.0 | |||
|- | |- | ||
| | ! style="text-align:center; font-size:100%;" | 6 | ||
| style=" background-color:#FF0;" | 720.0 | |||
| style=" background-color:#FF0;" | 360.0 | |||
| style=" background-color:#92D050;" | 240.0 | |||
| style=" background-color:#92D050;" | 180.0 | |||
| style=" background-color:#92D050;" | 144.0 | |||
| style=" background-color:#92D050;" | 120.0 | |||
| style=" background-color:#92D050;" | 102.9 | |||
| style=" background-color:#92D050;" | 90.0 | |||
| style=" background-color:#92D050;" | 80.0 | |||
| style=" background-color:#92D050;" | 72.0 | |||
|- | |- | ||
| | ! style="text-align:center; font-size:100%;" | 8 | ||
| style=" background-color:#ED7D31;" | 1,280.0 | |||
| style=" background-color:#ED7D31;" | 640.0 | |||
| style=" background-color:#FF0;" | 426.7 | |||
| style=" background-color:#92D050;" | 320.0 | |||
| style=" background-color:#92D050;" | 256.0 | |||
| style=" background-color:#92D050;" | 213.3 | |||
| style=" background-color:#92D050;" | 182.9 | |||
| style=" background-color:#92D050;" | 160.0 | |||
| style=" background-color:#92D050;" | 142.2 | |||
| style=" background-color:#92D050;" | 128.0 | |||
|- | |- | ||
| | ! style="text-align:center; font-size:100%;" | 10 | ||
| style=" background-color:#ED7D31;" | 2,000.0 | |||
| style=" background-color:#ED7D31;" | 1,000.0 | |||
| style=" background-color:#ED7D31;" | 666.7 | |||
| style=" background-color:#ED7D31;" | 500.0 | |||
| style=" background-color:#92D050;" | 400.0 | |||
| style=" background-color:#92D050;" | 333.3 | |||
| style=" background-color:#92D050;" | 285.7 | |||
| style=" background-color:#92D050;" | 250.0 | |||
| style=" background-color:#92D050;" | 222.2 | |||
| style=" background-color:#92D050;" | 200.0 | |||
|- | |- | ||
| 8 || 4 || | ! style="text-align:center; font-size:100%;" | 12 | ||
| style=" background-color:#F00;" | 2,880.0 | |||
| style=" background-color:#ED7D31;" | 1,440.0 | |||
| style=" background-color:#ED7D31;" | 960.0 | |||
| style=" background-color:#ED7D31;" | 720.0 | |||
| style=" background-color:#ED7D31;" | 576.0 | |||
| style=" background-color:#92D050;" | 480.0 | |||
| style=" background-color:#92D050;" | 411.4 | |||
| style=" background-color:#92D050;" | 360.0 | |||
| style=" background-color:#92D050;" | 320.0 | |||
| style=" background-color:#92D050;" | 288.0 | |||
|- | |||
! style="text-align:center; font-size:100%;" | 14 | |||
| style=" background-color:#F00;" | 3,920.0 | |||
| style=" background-color:#F00;" | 1,960.0 | |||
| style=" background-color:#F00;" | 1,306.7 | |||
| style=" background-color:#ED7D31;" | 980.0 | |||
| style=" background-color:#ED7D31;" | 784.0 | |||
| style=" background-color:#ED7D31;" | 653.3 | |||
| style=" background-color:#92D050;" | 560.0 | |||
| style=" background-color:#92D050;" | 490.0 | |||
| style=" background-color:#92D050;" | 435.6 | |||
| style=" background-color:#92D050;" | 392.0 | |||
|- | |||
! style="text-align:center; font-size:100%;" | 16 | |||
| style=" background-color:#F00;" | 5,120.0 | |||
| style=" background-color:#F00;" | 2,560.0 | |||
| style=" background-color:#F00;" | 1,706.7 | |||
| style=" background-color:#F00;" | 1,280.0 | |||
| style=" background-color:#F00;" | 1,024.0 | |||
| style=" background-color:#ED7D31;" | 853.3 | |||
| style=" background-color:#ED7D31;" | 731.4 | |||
| style=" background-color:#92D050;" | 640.0 | |||
| style=" background-color:#92D050;" | 568.9 | |||
| style=" background-color:#92D050;" | 512.0 | |||
|- | |||
! style="text-align:center; font-size:100%;" | 18 | |||
| style=" background-color:#F00;" | 6,480.0 | |||
| style=" background-color:#F00;" | 3,240.0 | |||
| style=" background-color:#F00;" | 2,160.0 | |||
| style=" background-color:#F00;" | 1,620.0 | |||
| style=" background-color:#F00;" | 1,296.0 | |||
| style=" background-color:#F00;" | 1,080.0 | |||
| style=" background-color:#F00;" | 925.7 | |||
| style=" background-color:#ED7D31;" | 810.0 | |||
| style=" background-color:#92D050;" | 720.0 | |||
| style=" background-color:#92D050;" | 648.0 | |||
|- | |||
! style="text-align:center; font-size:100%;" | 20 | |||
| style=" background-color:#F00;" | 8,000.0 | |||
| style=" background-color:#F00;" | 4,000.0 | |||
| style=" background-color:#F00;" | 2,666.7 | |||
| style=" background-color:#F00;" | 2,000.0 | |||
| style=" background-color:#F00;" | 1,600.0 | |||
| style=" background-color:#F00;" | 1,333.3 | |||
| style=" background-color:#F00;" | 1,142.9 | |||
| style=" background-color:#F00;" | 1,000.0 | |||
| style=" background-color:#F00;" | 888.9 | |||
| style=" background-color:#92D050;" | 800.0 | |||
|- | |||
! style="text-align:center; font-size:100%;" | 22 | |||
| style=" background-color:#F00;" | 9,680.0 | |||
| style=" background-color:#F00;" | 4,840.0 | |||
| style=" background-color:#F00;" | 3,226.7 | |||
| style=" background-color:#F00;" | 2,420.0 | |||
| style=" background-color:#F00;" | 1,936.0 | |||
| style=" background-color:#F00;" | 1,613.3 | |||
| style=" background-color:#F00;" | 1,382.9 | |||
| style=" background-color:#F00;" | 1,210.0 | |||
| style=" background-color:#F00;" | 1,075.6 | |||
| style=" background-color:#F00;" | 968.0 | |||
|} | |} | ||
</div> | |||
=== Maintenance === | |||
The AME will stop generating power when its fuel has been used up. It is wise to periodically check on the AME to make sure it is not out of fuel. If the fuel runs out, you must refuel it: | The AME will stop generating power when its fuel has been used up. It is wise to periodically check on the AME to make sure it is not out of fuel. If the fuel runs out, you must refuel it: | ||
| Line 64: | Line 219: | ||
# Turn the AME back on. | # Turn the AME back on. | ||
It is also wise to periodically check on the AME, since it is a prime target for [[Traitor| | It is also wise to periodically check on the AME, since it is a prime target for [[Traitor|sabotage]]. | ||
== Thermoelectric Generator (TEG) == | |||
The TEG is a generator that uses the thermal potential difference between two gasses to create power. It consists normally of 5 components, the TEG itself, the burn room, the hot loop, the cold loop, fuel mixer. | |||
''Note: There are many ways to setup a TEG this is a basic setup.'' | |||
=== Setup === | |||
The setup for the TEG should only be performed by crew familiar with atmospherics. | |||
==== Burn Room ==== | |||
Most stations should have a burn room on the station or 1 tile away or so. It normally has either airlocks or blast doors that will require you to enter. Most of the time the burn rooms themselves do not require modification though they may be inefficient. It is wise not to enter whilst the TEG is running unless you are in fire-gear or an appropriate atmos suit. Engi borgs are immune to fire and can enter freely. | |||
Burn rooms require the following: | |||
# Large area. 3x3 minimally | |||
# Reinforced walls or reinforced glass. Using weaker walls or glass could cause a TEGLoose or venting of the burn room. | |||
# Fuel mix injector. This should be a gas pipe injector piped from the fuel mixer. | |||
# Igniter (optional) You can toss a flare through the door with a holofan as an alternative, once the initial ignition is complete. Reignition is not normally needed. | |||
# Hot loop radiators. These get the heat from the burn room into the hotloop. | |||
# Vent with inlet pressure regulator to space (optional). This will prevent the room from getting too overpressure. Without it you will need to manually vent the room occasionally. | |||
==== Radiator arrays ==== | |||
This is relevant to both hot and cold loops: | |||
A radiator array is when you want to have a maximal heat transfer with a room or environment. | |||
The setup is as follows: | |||
# Input pipe from a loop | |||
# Branching pipes | |||
# Volumetric pumps on each branch (the setting should be a division based on how many rads you are looking to have, for example 1 gang is 200, 2 is 100, 3 is 70, 4 is 50, 5 is 40 etc) | |||
# Followed by a radiator | |||
# Followed by a pressure pump (Always set to maximum) | |||
# Merging pipes | |||
# Output pipe | |||
==== Hot loop ==== | |||
The hot loop is a pipe loop that goes from the burn chamber to the TEG. Pay attention to the pipes going into the TEG as they have a set-direction. Most stations hot-loops will be sufficient as standard. | |||
=== Solar Power | For the gas use frezon if available or plasma if not. | ||
Hot loops requires | |||
# Pipes to the TEG | |||
# Pumps (normally volumetric) to the flow direction of the TEG | |||
# Pipes to the burn room | |||
# Radiators inside the burn room. These can be done with radiator arrays for maximum efficiency but it is not required. ''If connecting rads one-after-another then place a pump every 2 rads otherwise the rads will 'choke' the hotloop and no gas will make it through'' | |||
# Canister connector with pump. This is to add gas to the loop, it is not a constant input and only a small amount of gas is required. | |||
'''Importantly: Do not add too much hotloop gas. Volumetic pumps cannot pump over 9000kpa, once the gas gets warm it will expand and vastly increase in pressure. If you are unsure on the specific station, get everything running before adding gas. If you already have too much gas then you will need to vent some.''' | |||
==== Cold loop ==== | |||
The cold loop is the easier side of the loops. These normally go to space and have a radiator array within space. | |||
For Gas: As with the hot-loop, use frezon if available or plasma if not. | |||
Cold loop requires | |||
# Pipes to the TEG | |||
# Pipes to space | |||
# Radiator array in space (recommend at-least 4 gang) | |||
# Canister connector with pump. You do not have to be careful when adding this, normally a single canister will do. | |||
==== Fuel mixer ==== | |||
This is a simple part of the setup, but to much debate. | |||
This is a pipe from the station's storage tanks or with canisters into a atmos mixer | |||
Mixes between (3% - 65% plasma) are all technically valid. If you are unsure, use 5%. | |||
=== Start up === | |||
To start up the TEG verify that all pipes are in a satisfactory configuration from setup. You do not have to remove every single extra pump or filter though doing so may help efficiency. | |||
# Vent the burn room using the bunker doors | |||
# Enable all pumps on the hot loop and cold loop, '''Except for the hot loop gas canister input''' (double check they are at the correct values as mentioned in the radiator arrays section if the station is using those) | |||
# Enable the cold loop canister pump (This should dump the entire canister into the cold loop, if all goes well the cold side of the TEG should light up) | |||
# Close the burn room doors | |||
# Enable the mixer and injector pump if it has a separate one | |||
# Ignite the fuel mixture with the igniter or this can be done with by throwing a lit welder in, flare or asking an engi borg (Ensure you use a holofan when opening the door) | |||
# Wait for a minute or so whilst the burn heats up | |||
# Slowly add gas to the hot loop | |||
# The TEG should light up and begin producing power | |||
# Continue adding gas until the hot loop produces about 2x as much power as is needed | |||
# If all goes well then the TEG should be stabling producing station power. It should slowly be decreasing as the room gets colder, each ignition should increase it again though. | |||
=== Troubleshooting === | |||
This section will cover problems that can be caused via a bad setup, poor startup procedure or sabotage. | |||
==== The TEG produces power every few seconds but not all the time or is unstable ==== | |||
This is likely because the hot loop is flooded, add a vent with a pump to space so that you can remove some of the hotloop gas. | |||
==== The TEG produces barely any power ==== | |||
This can have a number of causes | |||
# Check there are not too many radiators in series on the hot loop. | |||
# Ensure all pumps are set to a correct value (check pressure pumps as they default to 101.3kpa) | |||
# Check the loops have enough gas | |||
# Check for any pumps that are flashing red (you may of flooded the hot loop, see above) | |||
==== The TEG produces no power ==== | |||
Assuming the TEG was correctly fired. | |||
Check all pumps, likely either the hot loop or cold loop isn't fully activated. | |||
== Solar Power == | |||
Solar power is a passive means of generating power. A solar array is made up of a number of solar panels, a single solar tracker device and a solar control computer (console) nearby to properly control and manage the panels. | Solar power is a passive means of generating power. A solar array is made up of a number of solar panels, a single solar tracker device and a solar control computer (console) nearby to properly control and manage the panels. | ||
| Line 77: | Line 324: | ||
A typical panel near max output will produce 1500W (1.5kW). This would be enough to power roughly 1 machine and 1 computer (this figure may change as balance changes are made). | A typical panel near max output will produce 1500W (1.5kW). This would be enough to power roughly 1 machine and 1 computer (this figure may change as balance changes are made). | ||
== | == "Generator" (Thermoelectric Generator) == | ||
The simplest and most basic of all generators on this list is the standard portable generator. This generator when wrenched down on to a tile above a HV cable will produce 3000W (3kW) of electricity to the grid. Currently they do not consume any fuel | The simplest and most basic of all generators on this list is the standard portable generator. This generator when wrenched down on to a tile above a HV cable will produce 3000W (3kW) of electricity to the grid. Currently they do not consume any fuel, may do so in the future. They are typically found onboard the cargo shuttle and other shuttles as a source of infinite power. Using them to power the actual station is frowned upon. | ||
== "P.A.C.M.A.N."s == | |||
The simplest and most basic of all generators on this list are the "P.A.C.M.A.N." line of portable generators. | |||
The J.R.P.A.C.M.A.N. can be found in maintenance areas, and runs on simple welding fuel, also found in maintenance. Anchor it to an LV cable and power it up. Because it generates LV power, it is only able to power one APC's worth of devices. It also generates exhaust fumes, so make sure you set it up in a well-ventilated area. | |||
The | |||
The singularity must be kept inside a containment field setup with emitters, otherwise if not contained the singularity will consume matter like a black hole and grow to a massive state. If starved of particles or matter, the singularity will slowly shrink until it collapses so once the singularity is of the correct size, it's wise to turn down the particle accelerator to a lower power setting to prevent it growing out of hand. | The other "P.A.C.M.A.N." generators are intended for usage by engineering for advanced power scenarios. Bootstrapping the engine, powering departments, and so on. unlike the J.R.P.A.C.M.A.N. They connect directly to MV or HV power cables, and are able to switch between them for flexibility. The standard P.A.C.M.A.N. is powered by solid plasma sheets, and the S.U.P.E.R.P.A.C.M.A.N. runs on uranium sheets, and produce enough power for things like shuttles. | ||
== Gravitational Singularity Engine == | |||
The [[singularity]] is one of the most well known and potentially dangerous forms of generating power. It can yield infinite power, with no fueling required but it can also destroy the whole station with equal measure if it gets loose. It uses a Particle Accelerator to fire high energy particles at a singularity generator to spawn a singularity. The singularity then pulses radiation which is absorbed by radiation collectors around it's perimeter. | |||
=== Setup === | |||
[[File:SingularityContainmentFieldExemple.png|thumb|Small exemple of a containment field.]] | |||
The Gravitational Singularity Engine requires 4 subsystems to work properly: | |||
==== Gravitational Singularity Generator ==== | |||
[[File:SingularityGenerator.png|64px]]<br> | |||
The generator should be anchored at the center of the containment area as it is where the singularity will appear at. | |||
==== Containment field ==== | |||
The singularity must be kept inside a containment field setup with emitters, otherwise if not contained the singularity will consume matter like a black hole and grow to a massive state. | |||
[[File:Emitter.png|64px]]<br> | |||
The emitters connect to MV cables and fire lasers as long as they have power and are turned on. Fire the emitters at containment field generators to activate them. | |||
[[File:ContainmentFieldGenerator.png|64px]]<br> | |||
If two containment field generators are active, in range and in the same cardinal axis, a containment field will appear. The containment field will repel the singularity, keeping it from escaping, and yielding a little bit of power every time anything bounces off of them. | |||
Emitter lasers and containment field can cause damage, avoid touching them when active. | |||
==== Radiation collectors ==== | |||
[[File:RadiationCollector.png|64px]]<br> | |||
They connect to HV cables and generate power from nearby radiation sources when turned on. | |||
==== Particle accelerator ==== | |||
[[File:ParticleAcceleratorExemple.png|thumb|Exemple of built PA facing North.]] | |||
The Particle Accelerator (PA) is a multi-tile structure that launches accelerated particles from its emitters. The emitters should always face the gravitational singularity generator. Some stations already have an unfinished PA system. | |||
==== Turn on ==== | |||
'''DO NOT''' turn the PA unless all other subsystems are working properly. | |||
Turn the power on by using the PA control computer. Set strength to an appropriate level. The higher the output strength is set on the PA control computer, the bigger the singularity will be. The PA will now draw power from the power net and start firing particles at the gravitational singularity generator. This should make a [[singularity]] slowly appear at the position of the Gravitational singularity generator. | |||
If starved of particles or matter, the singularity will slowly shrink until it collapses so once the singularity is of the correct size, it's wise to turn down the particle accelerator to a lower power setting to prevent it growing out of hand. | |||
The largest size singularity before you risk it breaking loose can generate between 1.4 and 1.6 MW with 24 radiation collectors. This value is very likely to change and will even change depending on the layout of your engine (radiation falls off over distance so closer collectors will net more power). In future, radiation collectors will also require plasma tanks to function and will run out over time. | The largest size singularity before you risk it breaking loose can generate between 1.4 and 1.6 MW with 24 radiation collectors. This value is very likely to change and will even change depending on the layout of your engine (radiation falls off over distance so closer collectors will net more power). In future, radiation collectors will also require plasma tanks to function and will run out over time. | ||
<!-- | === Safety === | ||
Singularities emits radiation around it, so always keep at a distance and equip radiation protective gear if you need to get closer. Seek medical attention if experiencing health issues. | |||
A singularity might move around, but the containment field will repel it. If it manages to escapes its containment field, often referred to as a [[Singularity#"Singuloose"|"singuloose"]], it will attract and then consume everything in its way. In such circumstances, there is little to be done other than running in the opposite direction. | |||
<!-- == Supermatter (SM) Engine == | |||
To be added. --> | To be added. --> | ||
{{Guides Menu}} | {{Guides Menu}} | ||
Latest revision as of 12:48, 1 June 2026
| This page needs revising! This page contains information that is either out-of-date or from a different source (e.g. Upstream SS14). Some information on this page may differ from how it actually works on Delta-V. Reason for revision: "Severly Outdated. Needs sections on the TEG (very important!), Tesla" |

Power
Engineering generates power, which is essential for keeping a well-functioning space station from descending into darkness. Most computers, machines, lighting fixtures, and more require power to operate.
Supply and Demand
Running an efficient power operation is about delicately balancing the supply of power from generators with demand from station equipment. Thanks to cutting-edge energy storage technology (SMES, and batteries in substations and APCs) aboard NanoTransen stations, generators do not have to always match instantaneous station demand; it is enough to generate enough power to meet the average station demand.

Use the Power Monitoring Console to determine the station's power demand. In a well-functioning station, SMES balance the instantaneous demand with supply. Don't let them run out!
If long term demand exceeds supply, you will have angry station inhabitants complaining about lack of power. When supply exceeds demand, the extra power is used to charge energy storage devices. When all energy storage devices are full, the excess power is safely dissipated into space.
It is better to be in a long-term energy surplus than an energy deficit. On the other hand, if your station is powered by non-renewable sources like the Anti-Matter Engine (AME), generating much more power than you need wastes fuel and contributes to space warming, not to mention, wastes Logistics's money which they would have wasted on a lasers crate anyway.
The Power Hierarchy
Power transmission in SS14 comes in three different flavors, high voltage (HV) cables (orange), medium voltage (MV) cables (yellow) and low voltage (LV) cables (green).


Power flows from generators and power storage via HV cables to substations around the station. From substations, MV cables going out transmit power from the substation and connected grid to area power controllers (APCs) where LV cables take the power the rest of the way to consumers (3-4 tile radius from the APC to devices in the area). A cable must be placed under generators, storage, substations and APCs for them to function.
Separating your Grid
One device not mentioned so far is the cable terminal. In order to separate part of your power network you will need to use a cable terminal, with a HV cable on the terminal box side and the wire side facing towards a SMES. When a HV cable is then placed under the SMES this creates two distinct HV cable networks; the side with your generation on which ends at the cable terminal, and the storage / supply side which starts at the SMES and goes out to substations.
Currently if you place a substation on the generation side of your SMES it will drain into said SMES as a supplier. This is important as in this scenario if there isn't enough generation, the substation will drain to empty causing a blackout in its connected APCs while everything on the SMES side will remain powered.
Generation
All power on the station comes from either a generator or an energy storage device. In this section we will discuss generators, and in brief, engines. All engines are generators but not all generators are engines.
The Antimatter Engine
The Antimatter Engine (AME) is the main source of power for most stations. Engineering is responsible for setting up the AME at round start.
Setup
- Grab AME parts from a Packaged antimatter reactor crate and place one on each floor tile you want a piece of the reactor. The minimum is a 3×3 square, which gives one core.
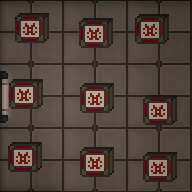
3×3, 1-core AME - With a multitool in hand, click the AME parts on the floor to build a piece of the reactor. If you mess up, you can deconstruct a built reactor with a lit welder.
- Open the antimatter control unit crate to obtain an AME Controller. Place it next to the reactor you just built and wrench it down. The HV cable underneath the controller will carry power produced from the AME. Make sure the controller is on HV wire.
- Open the antimatter containment jar crate to obtain antimatter containment jars. This is the fuel for the AME. With it in hand, click on the controller to place it in the AME. Change the Injection Amount to the desired level (see table below) and click Toggle Injection to turn the AME on.
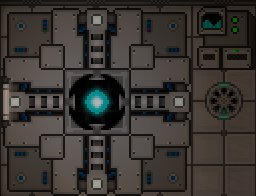
Finished AME


| Warning Do not set injection greater than (2× the number of cores). Doing so will cause reactor instability, which will sooner or later destroy the reactor. |

The wattage produced by the AME in different configurations is shown below. The color indicates the state - green: safe, yellow: Overloaded (explodes eventually), Orange: Heavily Overloaded (explodes soon), Red: Extremely Overloaded (explodes within the minute)
| Cores | |||||||||||
|---|---|---|---|---|---|---|---|---|---|---|---|
| 1 | 2 | 3 | 4 | 5 | 6 | 7 | 8 | 9 | 10 | ||
| Injection | 2 | 80.0 | 40.0 | 26.7 | 20.0 | 16.0 | 13.3 | 11.4 | 10.0 | 8.9 | 8.0 |
| 4 | 320.0 | 160.0 | 106.7 | 80.0 | 64.0 | 53.3 | 45.7 | 40.0 | 35.6 | 32.0 | |
| 6 | 720.0 | 360.0 | 240.0 | 180.0 | 144.0 | 120.0 | 102.9 | 90.0 | 80.0 | 72.0 | |
| 8 | 1,280.0 | 640.0 | 426.7 | 320.0 | 256.0 | 213.3 | 182.9 | 160.0 | 142.2 | 128.0 | |
| 10 | 2,000.0 | 1,000.0 | 666.7 | 500.0 | 400.0 | 333.3 | 285.7 | 250.0 | 222.2 | 200.0 | |
| 12 | 2,880.0 | 1,440.0 | 960.0 | 720.0 | 576.0 | 480.0 | 411.4 | 360.0 | 320.0 | 288.0 | |
| 14 | 3,920.0 | 1,960.0 | 1,306.7 | 980.0 | 784.0 | 653.3 | 560.0 | 490.0 | 435.6 | 392.0 | |
| 16 | 5,120.0 | 2,560.0 | 1,706.7 | 1,280.0 | 1,024.0 | 853.3 | 731.4 | 640.0 | 568.9 | 512.0 | |
| 18 | 6,480.0 | 3,240.0 | 2,160.0 | 1,620.0 | 1,296.0 | 1,080.0 | 925.7 | 810.0 | 720.0 | 648.0 | |
| 20 | 8,000.0 | 4,000.0 | 2,666.7 | 2,000.0 | 1,600.0 | 1,333.3 | 1,142.9 | 1,000.0 | 888.9 | 800.0 | |
| 22 | 9,680.0 | 4,840.0 | 3,226.7 | 2,420.0 | 1,936.0 | 1,613.3 | 1,382.9 | 1,210.0 | 1,075.6 | 968.0 | |
Maintenance
The AME will stop generating power when its fuel has been used up. It is wise to periodically check on the AME to make sure it is not out of fuel. If the fuel runs out, you must refuel it:
- Make sure injection is off.
- Eject the existing fuel jar from the AME.
- Place a new fuel jar into the AME.
- Turn the AME back on.
It is also wise to periodically check on the AME, since it is a prime target for sabotage.
Thermoelectric Generator (TEG)
The TEG is a generator that uses the thermal potential difference between two gasses to create power. It consists normally of 5 components, the TEG itself, the burn room, the hot loop, the cold loop, fuel mixer. Note: There are many ways to setup a TEG this is a basic setup.
Setup
The setup for the TEG should only be performed by crew familiar with atmospherics.
Burn Room
Most stations should have a burn room on the station or 1 tile away or so. It normally has either airlocks or blast doors that will require you to enter. Most of the time the burn rooms themselves do not require modification though they may be inefficient. It is wise not to enter whilst the TEG is running unless you are in fire-gear or an appropriate atmos suit. Engi borgs are immune to fire and can enter freely.
Burn rooms require the following:
- Large area. 3x3 minimally
- Reinforced walls or reinforced glass. Using weaker walls or glass could cause a TEGLoose or venting of the burn room.
- Fuel mix injector. This should be a gas pipe injector piped from the fuel mixer.
- Igniter (optional) You can toss a flare through the door with a holofan as an alternative, once the initial ignition is complete. Reignition is not normally needed.
- Hot loop radiators. These get the heat from the burn room into the hotloop.
- Vent with inlet pressure regulator to space (optional). This will prevent the room from getting too overpressure. Without it you will need to manually vent the room occasionally.
Radiator arrays
This is relevant to both hot and cold loops: A radiator array is when you want to have a maximal heat transfer with a room or environment. The setup is as follows:
- Input pipe from a loop
- Branching pipes
- Volumetric pumps on each branch (the setting should be a division based on how many rads you are looking to have, for example 1 gang is 200, 2 is 100, 3 is 70, 4 is 50, 5 is 40 etc)
- Followed by a radiator
- Followed by a pressure pump (Always set to maximum)
- Merging pipes
- Output pipe
Hot loop
The hot loop is a pipe loop that goes from the burn chamber to the TEG. Pay attention to the pipes going into the TEG as they have a set-direction. Most stations hot-loops will be sufficient as standard.
For the gas use frezon if available or plasma if not.
Hot loops requires
- Pipes to the TEG
- Pumps (normally volumetric) to the flow direction of the TEG
- Pipes to the burn room
- Radiators inside the burn room. These can be done with radiator arrays for maximum efficiency but it is not required. If connecting rads one-after-another then place a pump every 2 rads otherwise the rads will 'choke' the hotloop and no gas will make it through
- Canister connector with pump. This is to add gas to the loop, it is not a constant input and only a small amount of gas is required.
Importantly: Do not add too much hotloop gas. Volumetic pumps cannot pump over 9000kpa, once the gas gets warm it will expand and vastly increase in pressure. If you are unsure on the specific station, get everything running before adding gas. If you already have too much gas then you will need to vent some.
Cold loop
The cold loop is the easier side of the loops. These normally go to space and have a radiator array within space.
For Gas: As with the hot-loop, use frezon if available or plasma if not.
Cold loop requires
- Pipes to the TEG
- Pipes to space
- Radiator array in space (recommend at-least 4 gang)
- Canister connector with pump. You do not have to be careful when adding this, normally a single canister will do.
Fuel mixer
This is a simple part of the setup, but to much debate. This is a pipe from the station's storage tanks or with canisters into a atmos mixer Mixes between (3% - 65% plasma) are all technically valid. If you are unsure, use 5%.
Start up
To start up the TEG verify that all pipes are in a satisfactory configuration from setup. You do not have to remove every single extra pump or filter though doing so may help efficiency.
- Vent the burn room using the bunker doors
- Enable all pumps on the hot loop and cold loop, Except for the hot loop gas canister input (double check they are at the correct values as mentioned in the radiator arrays section if the station is using those)
- Enable the cold loop canister pump (This should dump the entire canister into the cold loop, if all goes well the cold side of the TEG should light up)
- Close the burn room doors
- Enable the mixer and injector pump if it has a separate one
- Ignite the fuel mixture with the igniter or this can be done with by throwing a lit welder in, flare or asking an engi borg (Ensure you use a holofan when opening the door)
- Wait for a minute or so whilst the burn heats up
- Slowly add gas to the hot loop
- The TEG should light up and begin producing power
- Continue adding gas until the hot loop produces about 2x as much power as is needed
- If all goes well then the TEG should be stabling producing station power. It should slowly be decreasing as the room gets colder, each ignition should increase it again though.
Troubleshooting
This section will cover problems that can be caused via a bad setup, poor startup procedure or sabotage.
The TEG produces power every few seconds but not all the time or is unstable
This is likely because the hot loop is flooded, add a vent with a pump to space so that you can remove some of the hotloop gas.
The TEG produces barely any power
This can have a number of causes
- Check there are not too many radiators in series on the hot loop.
- Ensure all pumps are set to a correct value (check pressure pumps as they default to 101.3kpa)
- Check the loops have enough gas
- Check for any pumps that are flashing red (you may of flooded the hot loop, see above)
The TEG produces no power
Assuming the TEG was correctly fired. Check all pumps, likely either the hot loop or cold loop isn't fully activated.
Solar Power
Solar power is a passive means of generating power. A solar array is made up of a number of solar panels, a single solar tracker device and a solar control computer (console) nearby to properly control and manage the panels.
Most if not all solar arrays start off not connected to the station, and need to be connected via HV cables underneath each panel and connected back to the station. Once connected, use the solar control computer to change the angle and speed of tracking for the panels as shown below:


Notice the graph on the right has a T shaped white line and a yellow / golden line. The aim is to alter the panel angle (white T line) to match the sun angle (yellow line). Some experimentation might be needed to setup the angular velocity correctly so that the lines stay in sync and generate maximum wattage.
A typical panel near max output will produce 1500W (1.5kW). This would be enough to power roughly 1 machine and 1 computer (this figure may change as balance changes are made).
"Generator" (Thermoelectric Generator)
The simplest and most basic of all generators on this list is the standard portable generator. This generator when wrenched down on to a tile above a HV cable will produce 3000W (3kW) of electricity to the grid. Currently they do not consume any fuel, may do so in the future. They are typically found onboard the cargo shuttle and other shuttles as a source of infinite power. Using them to power the actual station is frowned upon.
"P.A.C.M.A.N."s
The simplest and most basic of all generators on this list are the "P.A.C.M.A.N." line of portable generators.
The J.R.P.A.C.M.A.N. can be found in maintenance areas, and runs on simple welding fuel, also found in maintenance. Anchor it to an LV cable and power it up. Because it generates LV power, it is only able to power one APC's worth of devices. It also generates exhaust fumes, so make sure you set it up in a well-ventilated area.
The other "P.A.C.M.A.N." generators are intended for usage by engineering for advanced power scenarios. Bootstrapping the engine, powering departments, and so on. unlike the J.R.P.A.C.M.A.N. They connect directly to MV or HV power cables, and are able to switch between them for flexibility. The standard P.A.C.M.A.N. is powered by solid plasma sheets, and the S.U.P.E.R.P.A.C.M.A.N. runs on uranium sheets, and produce enough power for things like shuttles.
Gravitational Singularity Engine
The singularity is one of the most well known and potentially dangerous forms of generating power. It can yield infinite power, with no fueling required but it can also destroy the whole station with equal measure if it gets loose. It uses a Particle Accelerator to fire high energy particles at a singularity generator to spawn a singularity. The singularity then pulses radiation which is absorbed by radiation collectors around it's perimeter.
Setup

The Gravitational Singularity Engine requires 4 subsystems to work properly:
Gravitational Singularity Generator

The generator should be anchored at the center of the containment area as it is where the singularity will appear at.
Containment field
The singularity must be kept inside a containment field setup with emitters, otherwise if not contained the singularity will consume matter like a black hole and grow to a massive state.

The emitters connect to MV cables and fire lasers as long as they have power and are turned on. Fire the emitters at containment field generators to activate them.

If two containment field generators are active, in range and in the same cardinal axis, a containment field will appear. The containment field will repel the singularity, keeping it from escaping, and yielding a little bit of power every time anything bounces off of them.
Emitter lasers and containment field can cause damage, avoid touching them when active.
Radiation collectors

They connect to HV cables and generate power from nearby radiation sources when turned on.
Particle accelerator

The Particle Accelerator (PA) is a multi-tile structure that launches accelerated particles from its emitters. The emitters should always face the gravitational singularity generator. Some stations already have an unfinished PA system.
Turn on
DO NOT turn the PA unless all other subsystems are working properly.
Turn the power on by using the PA control computer. Set strength to an appropriate level. The higher the output strength is set on the PA control computer, the bigger the singularity will be. The PA will now draw power from the power net and start firing particles at the gravitational singularity generator. This should make a singularity slowly appear at the position of the Gravitational singularity generator.
If starved of particles or matter, the singularity will slowly shrink until it collapses so once the singularity is of the correct size, it's wise to turn down the particle accelerator to a lower power setting to prevent it growing out of hand.
The largest size singularity before you risk it breaking loose can generate between 1.4 and 1.6 MW with 24 radiation collectors. This value is very likely to change and will even change depending on the layout of your engine (radiation falls off over distance so closer collectors will net more power). In future, radiation collectors will also require plasma tanks to function and will run out over time.
Safety
Singularities emits radiation around it, so always keep at a distance and equip radiation protective gear if you need to get closer. Seek medical attention if experiencing health issues.
A singularity might move around, but the containment field will repel it. If it manages to escapes its containment field, often referred to as a "singuloose", it will attract and then consume everything in its way. In such circumstances, there is little to be done other than running in the opposite direction.